As of the latest release of LISTENTO plugin, Audiomovers supports Pro Tools’ new channel layouts and expanded track widths.
Audiomovers LISTENTO Version v2.94 – released 26 June 2023 – boasts support for all of the new Pro Tools channel layouts. The new Pro Tools version 2023.6 offers support for track bus and IO widths greater than 7.1.2 (specifically up to 7.1.6 in Pro Tools Studio and 9.1.6 in Pro Tools Ultimate), opening up support for Atmos mixing setups.
Download the latest versions of LISTENTO here
The support for Pro Tools’ new expanded channel widths comes on top of the existing partnership between Audiomovers and Avid, who have partnered on a bundle to bring remote audio collaboration to new and existing Pro Tools users:
– New annual Pro Tools Studio subscribers get a free year of LISTENTO Basic,
– New annual Pro Tools Ultimate subscription get a free year of LISTENTO Pro.
– All existing Pro Tools Studio and Ultimate customers get 25% off either a LISTENTO Basic or LISTENTO Pro annual subscription.
– This Pro Tools Audiomovers promotion will run from June 21 to July 26, 2023.
Learn more about the Avid and Audiomovers partnership here.
-
-
“That’s one take, it’s the live vocals, the whole thing is live.” – Vance Powell
Maybe it’s working or jamming with a childhood hero or hearing a vocal that made the hairs on the back of your neck stand up. This is #PinchYourself.
This time around, we hear from seven-time Grammy Award-winning producer, engineer, mixer and co-owner of Sputnik Sound Vance Powell (Chris Stapleton, Elle King, The White Stripes) lifts the veil and gives a behind-the-scenes look at the recording session of the iconic Chris Stapleton track Tennessee Whiskey.
Watch to discover his #PinchYourself moment.
Create your own once-in-a-lifetime moments with an extended one-month trial of LISTENTO, when you use the code PINCH at checkout.
WATCH FULL VIDEO
TRANSCRIPT
It’s a cover. It was a cover of a George Jones song, so it was so different from George Jones version. That now nobody knows the George Jones version.
I’ve got quite a few of them with Chris Stapleton, we had a session called ‘Jams’ where it was just the band jamming and I walked in and our assistant Soral, she had the session open, but it wasn’t recording, but it was open and they were playing Tennessee whiskey. And I was like, oh, that’s cool, hit record.
So she hits record and was like, oh my gosh, that’s great. And went out and talked a little bit and we cut it and then we cut it again. And that’s the master.
And the thing is crazy is we just thought, oh, that’s it. That’s cool. Great. Next song. And then we played it for, uh, the background singers and the band, the band we were recording and they all freaked out and they were like, oh my God. And we were like, Well, we know it’s good, but they’re like, play that again. Play it again. Play that part again. You know,
That’s one take is live vocals. Live. The whole thing is live, so that’s pretty cool. Tennessee Whiskey, by the way, is the most played song at Waffle Houses in America. It’s the most played song just by the way.
-
“It’s all about creating an environment where you feel happy, safe and creative.” – Alina Smith
#WhereIWork is where we visit the sacred spaces of producers, songwriters, engineers and artists to uncover how the world’s biggest records come together.
In this week’s episode, number-one-selling songwriter, record producer, and co-founder of LYRE Music, Alina Smith (ITZY, Red Velvet, Fall Out Boy), invited us into her LA home studio, a space adorned with treasured items, music memorabilia and unique furnishings that breathe positive energy and creativity and into her workflow.
WATCH FULL VIDEO
TRANSCRIPT
I would definitely say this space is a reflection of me and my husband because he built a lot of the things here like this desk.
I do everything here. I am very much like a homebody producer. A lot of the times they get invited to really nice studios and I’m like, can I not just do this at home?
Because I have all my gear that I like. I have the mics that I like. Everything is kind of set up for me and personalized, so that works really well for me.
I have a few fun things here in the studio. I have some signed records by groups like ABBA, Fleetwood Mac, Carole King, who’s one of my favorite songwriters and Aretha, who is one of my favorite singers.
You know, it’s just nice to have things here that I enjoy. I have this big, giant crystal on my desk, amethyst.
It’s all about creating the environment where you feel happy, safe and creative.
-
In the world of remote music collaboration, maintaining creative flow can be challenging, but is essential when producing high-quality music. This article aims to help those in creative fields to maintain their creative flow and continue producing high-quality work while working remotely.
Here we will provide insight into the challenges of remote collaboration and how to overcome them, including tips on communicating effectively, staying focused and organized, and staying motivated and engaged in the creative process.
Remote collaboration is becoming increasingly popular as it allows for creative partnerships with people from all over the world, regardless of geographical barriers. It also will enable musicians to efficiently work at their own pace, in their environment, and share their work with others.
Maintaining creative flow while collaborating remotely is crucial because it can help to ensure that the project stays on track and that the creative vision is fully realized.
Here are a few reasons why it’s crucial to maintain creative flow while collaborating remotely:
- Enhances productivity: When creative flow is maintained, it can increase productivity and allow the collaborators to produce more work in a shorter time.
- Fosters efficient communication: Collaborators who maintain creative flow are more likely to communicate frequently and effectively, leading to a better end product.
- Improves quality: Collaborators can build on each other’s ideas and create a more cohesive and polished end product by maintaining creative flow.
- Boosts motivation: When creative flow is maintained, it helps keep collaborators motivated and inspired, leading to a more positive and enjoyable working experience.
To maintain creative flow while collaborating remotely, it is essential to establish clear goals and expectations, maintain regular communication, and use LISTENTO which allows for real-time collaboration and sharing of ideas.
Regardless of whether you’re producing music, a podcast, a film score or any other project that requires high quality audio, our remote recording software, LISTENTO, meets the high standards of audio professionals.
Regardless of geographical distance, you can expect low latency, high quality audio streaming and recording that makes remote collaboration feel as if you’re in the same room, with no delays.
Challenges of Remote Audio Collaboration
Communication barriers
Communication barriers can have a significant impact on remote audio collaboration. When working remotely, audio collaboration often relies heavily on effective communication between team members to ensure that everyone is on the same page and that the project is progressing smoothly.
Communication barriers can arise when there is a lack of clarity or understanding or when technical issues prevent team members from communicating effectively.
Technical difficulties
Remote music collaboration technical difficulties include latency, synchronization, incompatible software/hardware, low-quality audio, and issues with file-sharing or cloud-based collaboration tools.
Latency issues and low-quality audio are some of the most common problems encountered when collaborating on music remotely due to the nature of data transmission over the internet. However, one can quickly amend these issues by using Audiomovers’ unique software, LISTENTO.
Latency is the delay between the time a sound is played or recorded and the time it is heard or processed. In other words, it is the delay between the input and output signals. In remote music collaboration, this delay can cause synchronization problems and timing issues between collaborators. This is especially true when working with real-time audio, such as live performances or recording sessions, where even slight delays can be noticeable and disruptive to the creative process.
Low-quality audio can also be a problem when collaborating remotely. Audio data is typically compressed for efficient transmission over the internet, which can result in a loss of quality. This can be especially problematic for music collaboration, where sound quality is a top priority. Additionally, network issues such as packet loss and bandwidth limitations can also cause audio quality to degrade, resulting in distortion, dropouts, and other issues.
To overcome these challenges, remote music collaborators often opt for LISTENTO, designed to minimize latency and ensure high-quality audio transmission.
With LISTENTO, you can enjoy lossless audio up to 32bit PCM with just 0.1 seconds delay. Find out more below, or start your free trial now.
Creative Block
Creative block can be a problem when collaborating remotely because it can slow down the creative process and make it more difficult to generate new ideas and stay on track. It can be incredibly challenging when collaborators are in different locations and unable to interact face-to-face, thus breaking the natural flow of bouncing ideas back and forth in a conversational manner.
Encountering creative blocks when collaborating remotely can cause significant issues. It can be helpful to maintain regular communication and check-ins, brainstorm and idea-generation sessions, take breaks to recharge and avoid burn-out, switch up the work environment, listen to music or other creative works, and try new techniques or approaches.
Maintaining a positive attitude, open-mindedness, being flexible and adaptable to changing circumstances or challenges are also essential.
Time zone differences
For several reasons, working in different time zones can be an issue when collaborating on music remotely.
First, it can be challenging to schedule virtual meetings or work sessions when collaborators are in different time zones. This can lead to delays in decision-making and problem-solving, which can slow down the creative process.
Second, if there is a significant time difference between collaborators, it can be challenging to communicate in real-time, especially if urgent issues need to be addressed. This can lead to miscommunications and delays in the collaborative process.
Third, working in different time zones can also impact the distribution of work and responsibilities. If collaborators are in different time zones, it may be necessary to divide tasks in a way that allows for work to be completed around the clock, which can be challenging to manage and coordinate.
It is essential to establish clear communication channels and protocols, use tools and technologies that facilitate collaboration across different time zones, and be flexible and adaptable in how work is organized and distributed. It’s also important to be respectful of each other’s work schedules and to find ways to accommodate different time zones in the collaborative process.
How to maintain creative flow when collaborating remotely.
- Establish a shared creative vision: Collaborators should have a shared vision for the project to ensure everyone is working towards the same goal.
- Utilize technology: Use LISTENTO which allows for real-time low latency audio sharing to ensure that all parties can collaborate seamlessly.
- Keep communication lines open: Regular check-ins and progress updates help to maintain momentum and allow collaborators to troubleshoot any issues in real time.
- Encourage creativity: Be open to new ideas and approaches, and create an environment where everyone feels comfortable to experiment and contribute.
- Embrace collaboration: Collaborators should be willing to share ideas, collaborate on arrangements and melodies and be open to inputting and receiving feedback, aligned in the goal of making the project the best it can be.
Real-world example of successful remote collaboration using Audiomovers
Audiomovers is a software tool that allows musicians to stream high-quality audio in real time over the internet. Here are two real-world examples of successful remote music collaboration using Audiomovers:
Grammy-Award-winning mixing engineer Jessie Ray Ersnter recounts how he was able to mix Burna Boy’s sixth studio album ‘Twice As Tall’ whilst moving between Airbnbs in LA.
Utilizing the LISTENTO plugin and remote desktop technology, he was able to tap into his studio set-up, sending mixes to himself and working on them remotely. Burna Boy was able to listen in and give real-time feedback from across the globe.
In a recent episode of #TheMakingOf, we caught up with the number-one-selling songwriter and producer Alina Smith to lift the hood on Elli Moore’s infectiously catchy single ‘Bathing Suit’ and how she used LISTENTO to remotely collaborate in real-time.

Maintaining creative flow is essential when collaborating remotely because it allows artists and musicians to collaborate effectively and produce their best work. Creative blocks and technical difficulties can be standard when working remotely, making it essential to establish clear communication, maintain a consistent schedule, and use technology to facilitate the collaborative process.
Collaborators can stay inspired, focused, and productive by maintaining creative flow, resulting in a successful remote music collaboration.
To maintain creative flow, one should:
- Establish clear communication
- Maintain a consistent schedule
- Use technology to facilitate the collaborative process
- Set clear goals and objectives
- Take breaks and practice self-care to avoid burnout.
By following these tips, collaborators can stay inspired, focused, and productive, resulting in a successful remote music collaboration.
-
How did the Abbey Road Studios’ recording engineers stream orchestral sessions before LISTENTO?
In this #TilYouMakeIt episode, Senior Recording Engineer, Andrew Dudman, explains the expensive, unorthodox method that was used.
In this example, it was a session for ‘Star Wars: The Phantom Menace’ taking place in Studio One where the engineers streamed over satellite to John Williams, George Lucas and the entire ‘Star Wars’ team based in LA while running lengthy cables to a broadcast truck in the studios’ car park.
“LISTENTO has revolutionized how we work on these remote projects.” – Andrew Dudman
WATCH FULL VIDEO
TRANSCRIPT
Cables running through the doors out to the, out to the car park, streaming over satellite to, to get to them
Before the rise of internet streaming and quick, simple, easy, easy methods to stream, uh, music on a certain Star Wars session.
That was just a day’s recording, so no one came over. Producers John Williams and George Lucas, everyone stayed in in America to make it work. We actually had an outside broadcast truck he’d pay through the nose.
For bandwidth and quality wasn’t great. Nowadays, obviously we don’t have to worry about getting trucks in or ISDN lines.
It’s so much easier these days using LISTENTO for the stream of the audio, whether it be stereo stems or five one, it literally has revolutionized how we work on these remote projects.
-
#DreamCollabs uncovers the reasons behind these collaborations and why it’s essential to dream big, whether meeting their childhood music heroes, working with an emerging artist that excites them or collaborating with an artist whose sound has influenced the creative choices these industry powerhouses make.
In this latest episode, we speak to the number-one-selling songwriter, record producer, and co-founder of LYRE Music, Alina Smith (ITZY, Red Velvet, Fall Out Boy) in her LA home studio.
Watch to discover who her dream collaborator is or, rather, who they could be. Creating magical collaborations does not always involve having the world’s biggest names in music. More often than not, it boils down to connection and what feels natural in the moment.
WATCH FULL VIDEO
TRANSCRIPT
A lot of people ask me about what’s your dream collaborator like? What artist could you work with if you had all the access in the world? No restrictions, and I have kind of a funny answer.
I don’t have anyone in mind because my modus operandi is I will work with who I’m meant to work with.
Yes, it could be maybe a very well-known artist, or it could be a person no one knows yet that’s gonna become this amazing person.
You will push sometimes for collaborations cuz somebody’s successful where they have this thing going on or this thing going on. But if it’s not natural, It doesn’t gel, it doesn’t work. And sometimes a person comes in and it doesn’t make logical sense, but you try it and it’s like the most beautiful thing.
To give an example, when we were starting LYRE, my partner, Ellie and I, my publisher at the time, really tried to discourage me from working with her cuz she was quite young. She was eighteen I believe when we started.
And they were like, oh, why are you working with those young girls? Kid, like you could be working with more established people and I just felt something really special there, so I pursued it regardless.
I just have an open mind to anything that feels right. Whoever is right will be right.
-
‘The first take you record could be the magic take. So you just need to have everything slick’ – Andrew Dudman.
In the latest #TilYouMakeIt episode Abbey Road Studios’ Senior Recording Engineer, Andrew Dudman speaks on the importance of precise planning ahead of a recording session and how the support of Abbey Road Studios’ team of assiduous engineers, recordists and runners enables big orchestral recordings to run like a well-oiled machine.
Many films are as famous for their soundtracks as they are for anything that happens on screen, and Andrew has been responsible for recording some of the most iconic and beloved scores in cinema, with credits including the Star Wars prequels, the Lord of the Rings trilogy, Hacksaw Ridge, Baby Driver and Gravity, to name just a few.
WATCH FULL VIDEO
TRANSCRIPT
The first take you record could be the magic take. So you just need to have everything slick.
Certain sessions, certain band recordings, you can kind of adjust as you go get the band in.
Everyone gets a feel of the vibe and then you kind of work out how you’re gonna do it. But when you’ve got a big orchestra, it needs to be organized.
That’s the joy of having the staff of this building where. You know, we’ve got six runners and nine assistants, and seven or eight engineers.
We’re very well organized, very well planned. When you come in with an empty studio, everyone has a detailed setup sheet, and we draw floor diagrams so you know where everything’s gonna be set out.
It would be chaos if you didn’t have a plan. Do you need to find out all the information in advance? Plan it all out. Get it ready.
-
Over the last few years, there has been an extreme growth in demand for immersive audio content, transforming the way we experience entertainment.
Immersive audio has been utilised in various forms of media, from music and motion pictures, to video games and virtual reality.
However, immersive audio is still very much the wild west, and there’s no right or wrong way to mix for immersive audio.
When it comes to mixing and especially mastering for immersive audio, similar to mixing for mono or stereo formats, it’s excellent to A/B your mix/master with similar tracks.
Using OMNIBUS and the Apple Music application, you can quickly and easily reference your immersive mixes to available immersive audio content from Apple Music.
Let’s walk through the setup process.
Mac & Apple music audio settings:
Set your computer’s audio playback device as one of the OMNIBUS drivers. I’ll use OMNIBUS A as my system’s audio for this demonstration. This will now allow any audio from your Mac to pass through OMNIBUS and allow you to designate the output. We’ll look into this later.
You’ll first need to open up the ‘Audio MIDI Setup’ application on your device and navigate to the OMNIBUS driver you’re using as your system’s audio device.
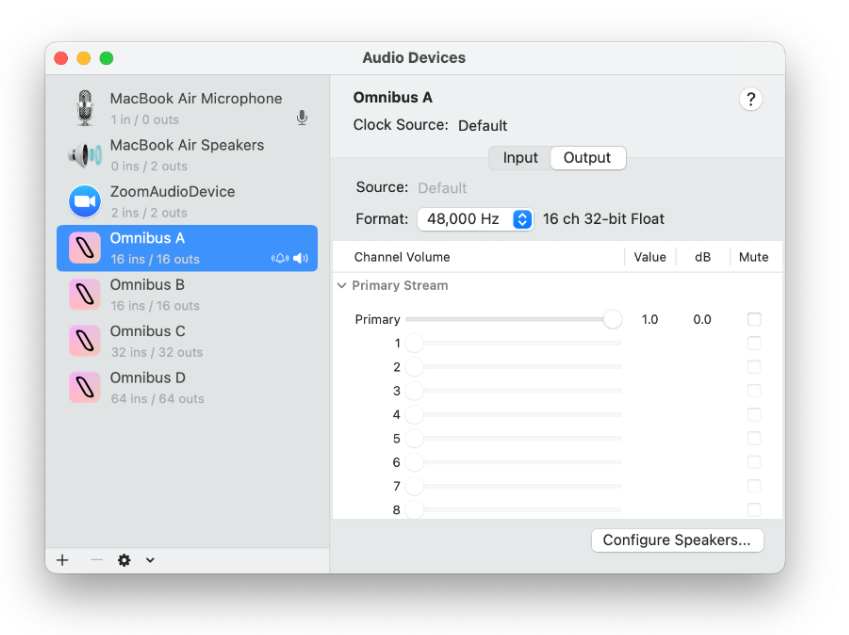
Click on configure speakers and select 7.1.4 as your speaker configuration. Make sure your speaker channels are from 1-12 as seen below.

Apple music playback settings:
In the Apple Music application, navigate to Music > Preferences > Playback. You will see Dolby Atmos playback settings. Select ‘Automatic’ here. These steps will allow the 7.1.4 discrete channels to output through channels 1-12 of your selected OMNIBUS device.
DAW’s playback engine:
In your chosen DAW or Dolby renderer (if using), select one of the other OMNIBUS drivers as your playback engine; I’m using OMNIBUS B for this; however, you could use any of the OMNIBUS drivers as long as it is different to the one selected as your Mac’s audio device.
Repeat the previous steps with your DAW’s OMNIBUS Driver in the audio midi setup.
Routing and Snapshots:
Now that the appropriate steps are complete, we can open OMNIBUS and begin our routine.
Route channels 1-12 of OMNIBUS A to your designated monitor outputs channels 1-12. This will allow the audio from Apple Music to travel through OMNIBUS into your designated 7.1.4 monitor outputs.
Now you’ve finished routing your audio to your designated monitor outputs, you can now save this routing configuration as a snapshot. Go to the snapshots tab in OMNIBUS, add a new snapshot, and save. You can label this snapshot if you wish; I’ve labelled mine as .7.1.4 Reference’.
Let’s now go to settings and clear our routing configuration. Now we can route channels 1-12 from OMNIBUS B (or your selected driver for your DAW) to your designated monitor output and save this as a snapshot. I’ve named this one as ‘7.1.4 DAW’.
Once you playback your session and the track you wish to reference, you can toggle between these two snapshots to hear our immersive mix and reference track separately with only a few clicks.
Get your free 7-day OMNIBUS demo now!