
The latest update to OMNIBUS 3 introduced network audio support for Apple AVB and NDI, allowing you to connect audio between multiple Macs with OMNIBUS installed.
In this article, we will be walking through getting set up with OMNIBUS’ built-in AVB support. But firstly, let’s talk a little bit about AVB and what it actually is.
AVB (Audio Video Bridging) is an audio over network protocol developed by the IAEEE allowing for audio transportation between AVB enabled audio devices and computers via Ethernet with ultra low latency. Apple introduced AVB support to all Mac’s in 2013. This feature sits under the hood of the Audio MIDI Setup application in the nether region that is the ATDECC controller. This technology allows Macs to communicate via ethernet and allow bidirectional audio communication between Macs using either the built-in ethernet ports on the Mac, or compatible AVB enabled thunderbolt to ethernet adapters.
AVB transports audio between devices over Ethernet. For Mac users, this means if your Mac has a built-in Ethernet port, it’s typically ready for AVB communication as these ports are Thunderbolt and AVB compliant. However, if you’re connecting a device like a MacBook Pro that lacks a built-in Ethernet port, you’ll need an AVB-enabled Thunderbolt-to-Ethernet adapter.
Now we’ve gone through our basic housekeeping, let’s start to look at OMNIBUS and the AVB setup and use cases.
Setting up your first OMNIBUS AVB Device
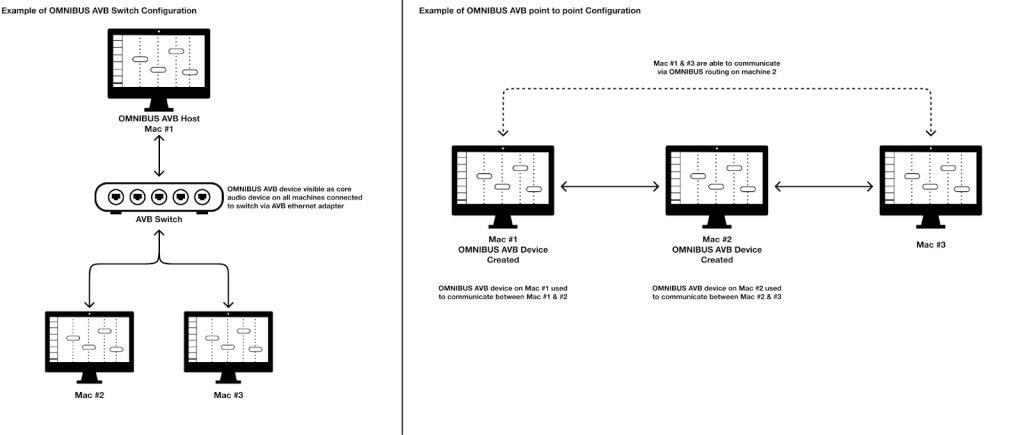
OMNIBUS AVB support allows you to create virtual AVB devices that can send and receive up to 200 channels of audio across your AVB network. Any connected Mac (via built-in Ethernet or compatible adapters) will recognize these as standard Core Audio devices, enabling seamless, low-latency audio exchange (roughly 2ms). A significant benefit is that only one Mac needs OMNIBUS installed for two Macs to communicate. Refer to the diagram below for examples of OMNIBUS’ AVB workflows.
Let’s now take a look at setting up an OMNIBUS AVB Device.
Firstly, to set this up you’ll need to head to the AVB configurator in OMNIBUS by heading to File / AVB Configurator.
This will open up the window of OMNIBUS where you can create and manage OMNIBUS AVB devices.
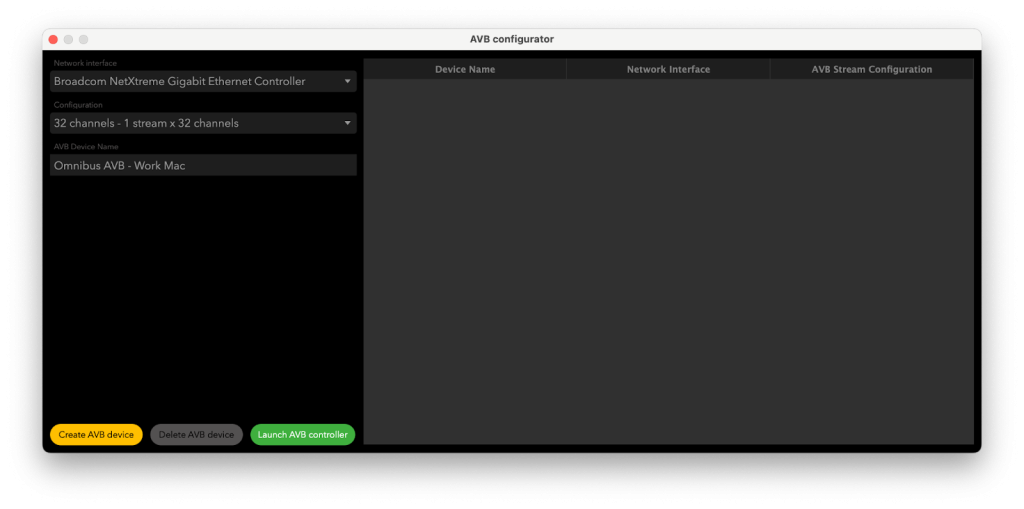
This is where you can create an OMNIBUS AVB Device. This will only be available when you have a supported network interface connected (AVB supported Ethernet adapter or built-in Ethernet Port). If not available, the window will appear blank.
Firstly, select your network interface. This is the AVB-enabled Ethernet port or adapter your OMNIBUS AVB device will use. In this example it is my Sonnet Ethernet adapter, this could be your Mac’s built in Ethernet port or any Thunderbolt to Ethernet adapter that supports AVB.
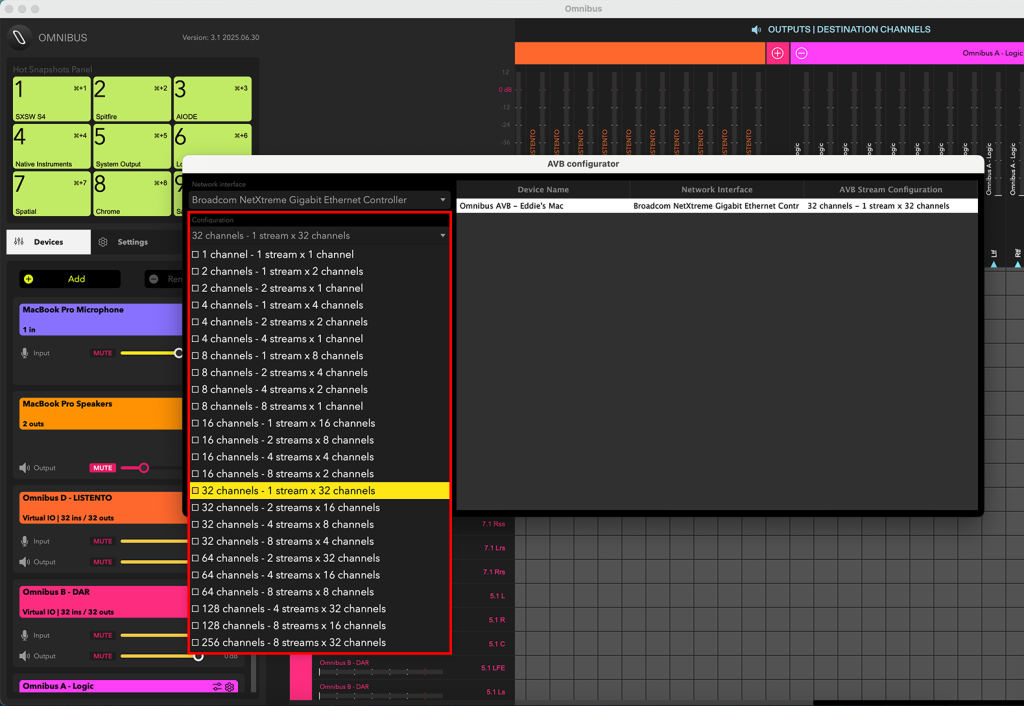
Below you can select your device configuration. This is where you can choose your OMNIBUS AVB device’s channels and streams. OMNIBUS’ AVB devices have a maximum channel count of 256 channels.
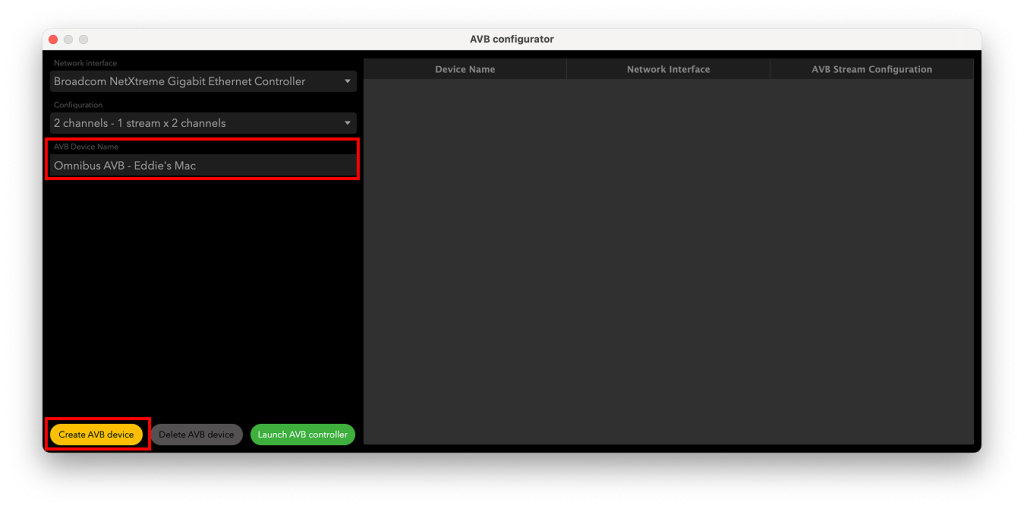
Lastly, you have the option to name the OMNIBUS AVB device you are creating. This comes in very handy when working with multiple OMNIBUS AVB devices.
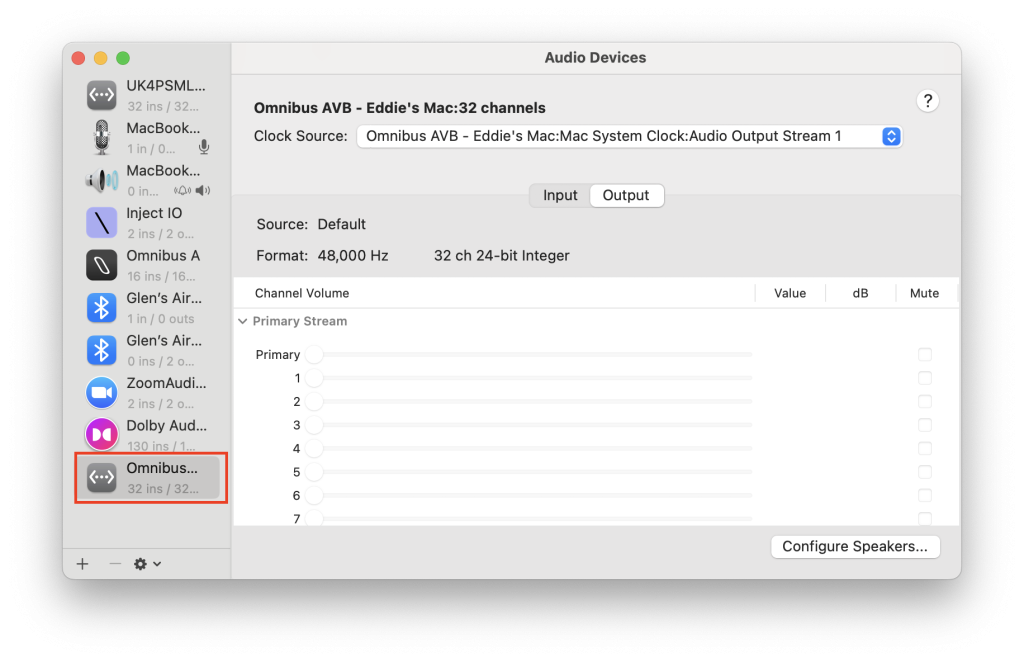
Once created, this AVB device will appear as a standard Core Audio device on any Mac (2013 or newer) connected to your OMNIBUS ‘host’ machine. Provided you’re using the correct adapters, you’ll find it in Audio MIDI Setup and can select it as an input/output (I/O) device in any Mac application or DAW that supports I/O selection.
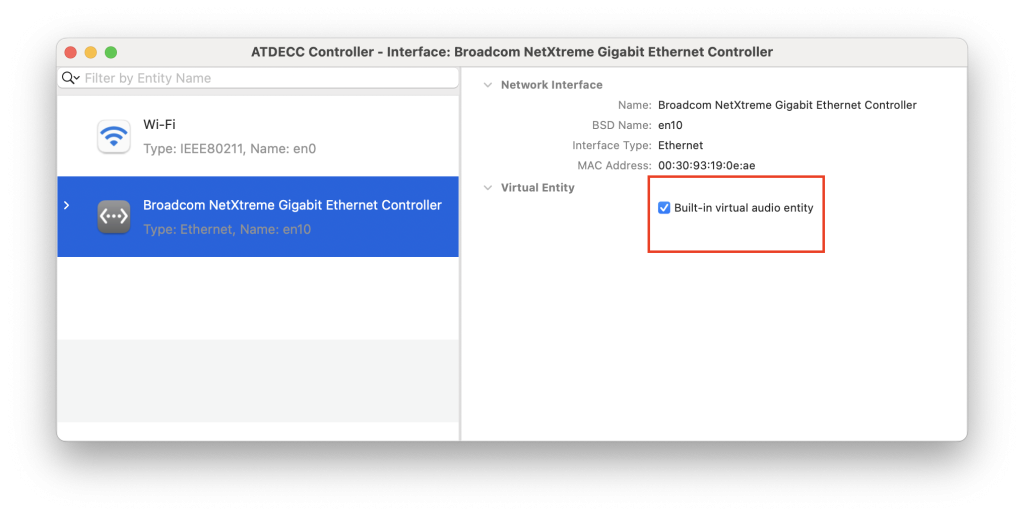
If the device doesn’t appear, check the ATDECC controller on the receiving Mac. Confirm that the network port used for the OMNIBUS AVB Mac has its built-in virtual audio entity enabled
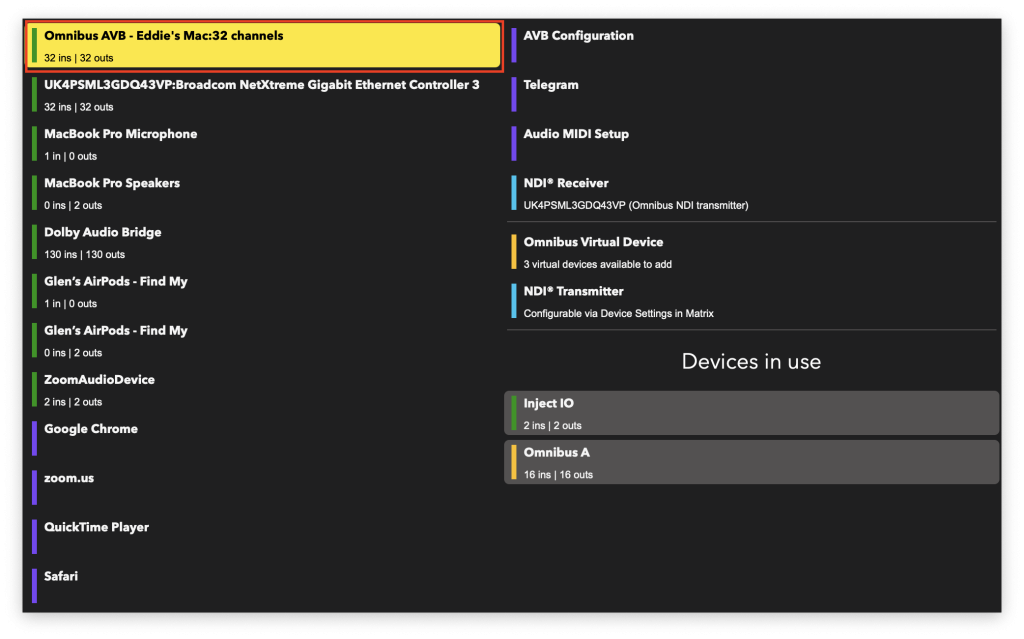
Once your ‘Host Mac’ connects to another Mac via AVB, the OMNIBUS AVB device you created will appear in OMNIBUS’ device list on both connected machines.
Note: If the host Mac isn’t connected to an AVB device, the OMNIBUS AVB device you created won’t be available as an audio device on that Mac.
Sending audio to your AVB Device from another Mac
If this is now all set up correctly, we can now start sending audio from one mac to another over an Ethernet cable using our AVB Ethernet to Thunderbolt adapters.
The images below displays a second Mac running a DAW. We have a DAW open with the output device set to my ‘Host Mac’s AVB device’.
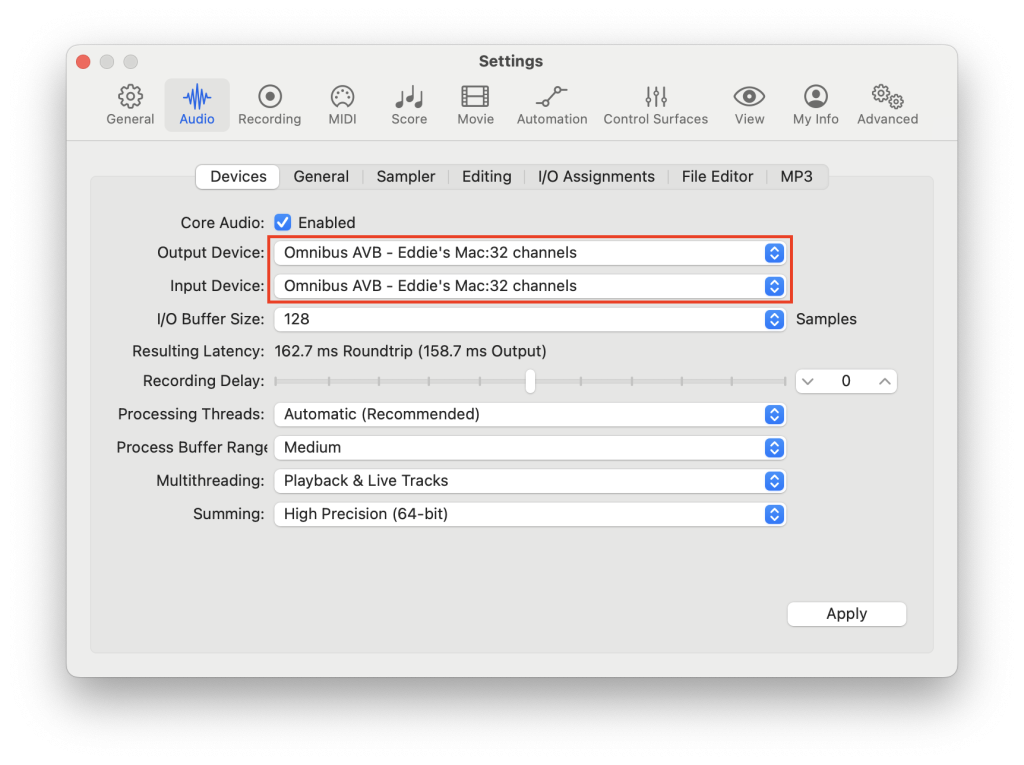
Setting Live (or any DAW) on the second Mac to output to the host machine’s AVB device means the audio will go through the AVB adapter and Ethernet cable, arriving in OMNIBUS on the host Mac.
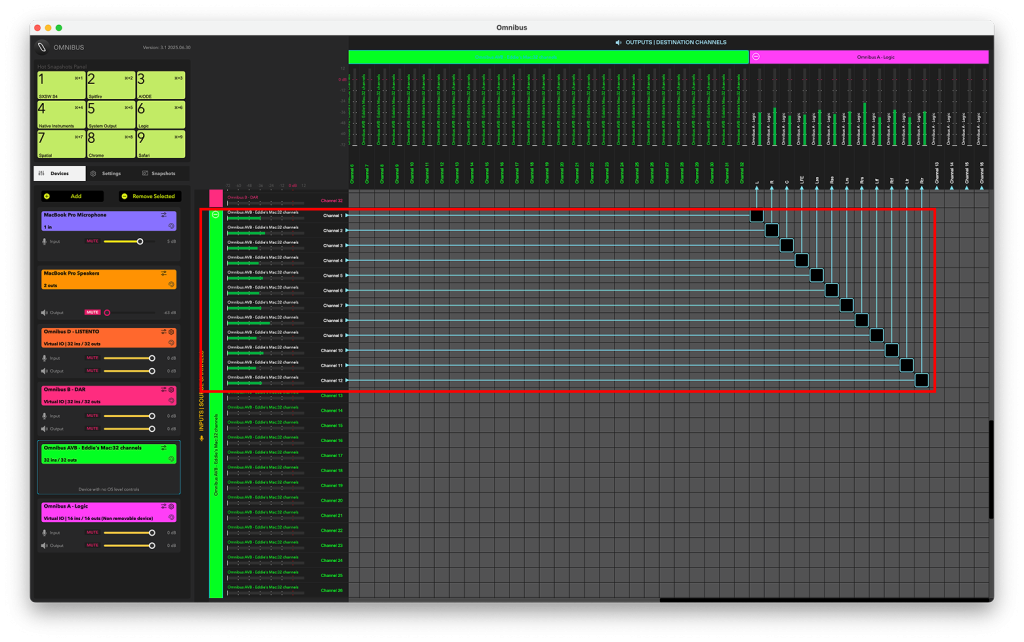
From the image above, you can see audio from the second Mac’s DAW is now available on the host Mac’s OMNIBUS. This lets you route audio from the second Mac to any audio destination on your host Mac. This also works in reverse: route audio to the AVB device in OMNIBUS from the host Mac, and it will appear in the second Mac’s DAW.
While this article shows only stereo, point-to-point examples, OMNIBUS AVB devices support up to 256 channels of audio. They can also communicate with multiple Macs via an AVB switch, opening up endless possibilities. Plus, the latency is incredibly low – sub-2ms!
This technology can be used for various tasks, including:
- Offsetting audio processing to a second machine to save CPU load.
- Connecting one Mac with Pro Tools to a second with an external Dolby Renderer.
- Even linking multiple lab machines in university classrooms.
And much more!
Try OMNIBUS now, and get a 30-day demo on us. If you have any questions about OMNIBUS’ AVB support you can also contact our team specialists via the support widget on our website.